FABtotum’s community highlights: multicolor 3D printing
Hi all!
As we truly believe in it, we thought that our community deserved to be highlighted. Many of our customers have been sharing with us their jobs: it is a source of pride for us to show you all of them and surely a source of inspiration for all of you.
So: from today on we will dedicate a post to our best users on a weekly basis.
Want to be one of them? Share with us your results, we’ll do our best to get them all published!
And don’t forget our social accounts: using them will get your objects straight onto the FABUI dashboard.
Today’s protagonist is: Angelo D’Angelo, aka @Johnnytrapano!
Our fellow has been using his FABtotum for a while now and many things have been created with it. Lately he stepped even further and developed a script than enables multicolor 3D printing on the FABtotum. Yes, really! He named it CFOG (Change Filament On the Go).

How is it possible? Here is what he did, briefly.
He developed a gcode which has to be added where needed between the lines. It allows to pause the task, quickly change the filament and start again. It is possible to just switch the color or even choose a different material.
The CFOG gets your print layered in as many different kind of shades as you want: of course the layers only allow the texture to be horizontal, but it is a great starting point.
How to use it?
That’s pretty simple actually. Just fit the portion of code where you want to change the color: the print will automatically pause, unload filament and wait you for load the new one
Here below you’ll find some detailed instructions to use the CFOG script. If you need more information, you can write him anytime. Meanwhile, download it here.
- Open your stl file in your preferred slicing software, Cura will do.
- Set the print as usual, using our settings and tuning them according to your FABtotum.
- Save the gcode as usual.
- Open the gcode file and decide where you want to switch the filament. Every layer is well mentioned in the file, so you just have to get there and paste the CFOG code.
Notice: Cura starts from layer “0” in the file but starts from layer “1” when visualizing the same one into the software. This means you’ll have to count down a layer to get the right one. - If something is required to be set or done during the whole job, you’ll find it in the code, highlighted with three “!” symbols.
Additional settings:
- Look for the last line starting with the command “G1” and copy it in the CFOG, just where needed (see below). Also: decrease the “E” value by 7: this will unload 7mm of filament from the hotend.

- Make always sure to set a Z value higher than the Z layer height where you use the CFOG.
This is where you need to do this:

- Look up for the code below in the script: at this same line you need to change the “E” value with the first one you can find after the CFOG one. This will make sure that anything we changed turns back at the original gcode settings. Here is where to proceed:
![]()
Once you get here, you are ready to save the file, get it on the FABtotum and print.
Of course, you’ll need to stand next to your 3D printer to be ready and switch color/material. Beeps from the FABtotum will alert you when it’s time to hurry up and operate. Make always sure to get rid of excess filament.
One last thing, as Johnnytrapano says on his blog post: if you need to change the printing temperatures, remember to do so by removing the “;” symbol from the right line and set the new value.

Here are a couple of examples, you can find more on his website.

3D printed cone: a standard icon
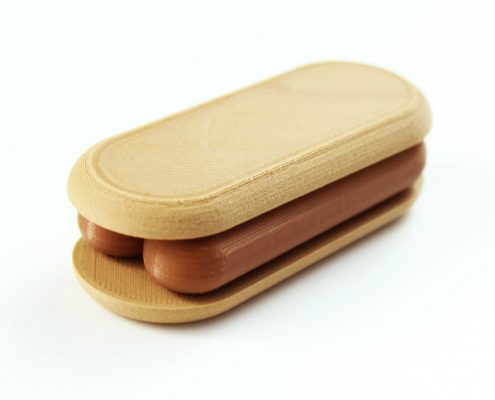
A 3D printed multicolor hotdog
Download the full CFOG here!
This is the first post regarding users’ experiences and developments. The FABtotum is an open source project that aims to grow together with the people who use it. Once you get your FABtotum, you automatically become part of the team.
Have ideas? Know how to get this CFOG better? Maybe you know how to turn it into a self-guided script using some Python Code? Maybe you will just try as it is? Whatever you do, share with us your results!
Keep following us,
Alessia








Leave a Reply
Want to join the discussion?Feel free to contribute!